Saturday, December 4, 2010

12x12 Tile Magnet Board

I made this 12x12 tile magnet board for a silent auction at church. I got the idea of the magnetic part of the tile a year or so ago from Adhering Thoughts blog. I've wanted to make it ever since. I like how it turned out. The metal is step flashing, I rounded the corners, adhered with liquid nails. The magnet is a flat page pebble that I inked with brown and red and heat set until the color matched, adhered to the magnet with liquid nails and E6000. I used brown Oracal vinyl and red Silhouette vinyl, choosing random fonts I liked on my computer. I have no idea where I got the heart shape, found it in my file stash.

Tuesday, November 23, 2010

Blessing Mix

I made Blessing Mix for my son's church and school teachers. Got the idea from Chick'n'Scratch
I used party favor boxes I had in my stash, wrapped with PP and attached the poem. Easy and cute (although they look horrible in the pic). Note to self: buy the candy corn during Halloween next year, it took me forever to find a Kroger that had any.

Friday, November 12, 2010

Mini Album

My bff threw her mom a 60th birthday party and I made this album with 60 pages for messages/well wishes and 12 pictures using the Lost & Found Madison Avenue "Cherish" line by My Mind's Eye.

Halloween

I made stickers for mini playdough tubs using SBC+ for my son's friends at school:


I made these for his teachers and a couple of special people, got the idea from Skip to My Lou:

Birthday Stuff using SBC+

My son wanted a Lightning McQueen birthday party. Here are some things I made for the party.
The invitation, printed as 4x6 photos: Thank You Notes, front and back, printed on 4x6 cardstock:


My bff made boxcars of the following characters, so I made license plates for the back of the boxcars, this was so much fun:


Friday, September 24, 2010

First Attempt at File Sharing

Creating Keepsakes posted this freebie today on Facebook from OScraps. They posted the files for Photoshop so I converted them to png files so I can use them in SBC+. The page dimensions are 5"x6". I will probably just save each page as a jpg and insert them into Word to print at home. I know SBC+ has a calendar feature but this was already done and I really liked the font, besides it only took a few minutes to fix up for SBC+. I hope someone finds this useful. I've gotten so many wonderful files from so many wonderful blogs, just wanted to give back. :)


april.page
august.page
december.page
february.page
instructions.page
january.page
july.page
june.page
march.page
may.page
november.page
october.page
september.page

Monday, August 16, 2010

Why I Love Crops!

I saw this template from CK's NSD, it was a digi template for Photoshop and I fell in love with it. I love anything with butterflies. Anyway, I made several unsuccessful attempts at recreating it in SBC+ until my last crop. A friend of mine showed me a picture that she shaped as the butterfly then cut into a grid and it hit me...I knew exactly what I needed to do to recreate the template. This is as close as I could get to it. The background paper and flourish are freebies from the CK NSD digifreebie kit and the large butterfly and title are from CM's Black and White Kit. I changed the opacity of the background paper, rubber stamped the flourish and for the title, I changed the color, glitterized it and added the 3D effect.
I couldn't think of any other recent pics that would fit the page except these (hence the color choice on the background/title).
This is a different version I made, I like them both. You can use either pictures or paper/color in each of the sections. I'll post the live templates just as soon as I figure out how to do that! :)

Thank you Crista!!

Thursday, July 22, 2010

Lined Zippered Pouch

I had so much fun making this pouch today. I saw the idea on a friend of mine's Facebook page and it looked so cute I had to try it. I was afraid it was going to be hard but it turned out to be rather easy, thanks to the wonderful tutorial here (and the great advice on doing corners without a quilter's tool here). I used 15x9" fabric pieces and a 12" zipper, next time I'll try to make it deeper and use heavier interfacing (used light-medium weight kind this time). You can't tell in the pic but the lining is deep purple. I still need to press the sides.

And in my true fashion, I sewed the handle in backwards at first, I always do this and double-checked myself and still put it in backwards. But that's the beauty of sewing, you can always rip it out and try again! :)

Wednesday, July 21, 2010

Hooded Towel

I used this tutorial at Obsessively Stitching to make a hooded towel for my son. It was so quick and easy and best of all, less than half the price of the hooded towels I've seen in stores!

Thursday, July 15, 2010

5x7 Magnetic Board

I made the magnetic board using the tutorial found on this blog. Angie's things are always so beautiful! The board itself is galvanized steel flashing and I couldn't find it anywhere locally (only aluminum) so I went in with a couple of other friends and we ordered 100 pieces from a seller on Amazon. Anyway, mod podge will not work to adhere the paper to the metal so I used my Glue Glider Pro and it worked just fine. I used PP and ribbon found in my scraps and the magnets are just white flat marbles that I inked to match glued on round magnets from Wal-Mart (although I think those magnets are too large, will use the smaller ones when I get some). You can attach pictures, notes, recipes...anything to this. Very quick and easy!

Wednesday, July 14, 2010

T-Shirt Dress

I tried my hand at a t-shirt dress and think it looks pretty good. I used the directions on this blog. I wish it was longer but it can also be worn as a shirt. The flower is another reverse applique, the edges will roll back in the wash.

Monday, July 12, 2010

Dinosaur Reverse Applique

I did this shirt today. I'm going to make the elastic waist shorts to match (like the Lightning McQueen shorts). I love this little dinosaur! I found the template online (can't remember where right now, will post when I find it). I did the eye, spots on the back and toes by hand since they were so small. I learned about this technique from a fellow mommy on a message board I'm on but can't get her blog to link here. :(

Friday, July 9, 2010

Reverse Applique

This is a shirt I just finished for my son, he loves Lightning McQueen! There are a ton of tutorials out there on how to do reverse applique, here is one close to what I did: http://lilblueboo.blogspot.com/2009/04/reverse-applique.html I really liked how this turned out and I think my son is going to love it. He saw it halfway done and wanted to wear it right away, I told him to wait b/c I needed to add some more "Kachow" to it. :) I think he's going to love the lightning bolts on the sleeves. I added the # on back for fun, it doesn't look as good as I hoped but it'll do. I'm making elastic waist shorts to match.

The "Kachow!" lightning bolt on the sleeve is his favorite part!

Tuesday, June 15, 2010

It's "time" for more SBC+ fun!!

I have a clock that I wanted to alter and after seeing photo clocks online, I thought I'd give it a try using SBC+. I think these turned out great! The hardest part was figuring out where to put the numbers for the clock so I found a worksheet online for kids, pasted the .jpg in my project, changed the opacity so I could barely see the numbers and added my numbers on top of it in a font I liked. In the first one, I blended the edges of my photo, used film grain on the background shape, color sampled from my pic, used an overlay (that was square and I cut out the part I liked in the shape of a circle) and added texture to the wordart. In the second one, I used a photo mask for the pic, gradient tool for my background paper color sampling from the pic, the same overlay as in the first one, used freebie wordart and flourishes (changed the opacity of the flourishes so they blend in) and typed the text. I don't like how the second one doesn't fill the circle but I had a hard time placing that pic without the hands of the clock inserting through my baby's face, thought that might look odd, haha! I'll post the finished product when I get the clock put back together.

Sunday, June 6, 2010

Gifts

This is a finished baby cross, I used SU rubons to decorate the mat to match, there are butterflies in the baby's room. I'm now officially out of my favorite SU rubons ever. :( I've seen these tiles all over the place and recreated my 3 favorites for bunco gifts, the girls really seemed to like them.


Tuesday, May 18, 2010

This template is from a blog I found called SquarePeg. I love how the page turned out. I don't usually do intro. pages for my scrapbooks but was forced into it to make the pages I made fit, I do both 1 page and 2 page LOs. I've made 25 other pages but won't post them all. :)

Friday, May 14, 2010

Virtual crop

I am so sad that I missed my crop so I decided to join them virtually, hehe. I saw this challenge and decided to take the plunge and join one. I think this embossing technique is amazing. And I can't believe how E-A-S-Y it was to do, gotta love SBC+! The frame is a CM digifreebie and the word art is from the Cottage Garden kit. I will say that the full resolution version is a lot more impressive than the low-res version I uploaded here. I'm really curious how this will print out in 12x12.

Thursday, May 13, 2010

I'm selling all of my supplies

I mean, I might as well! Look at this digicard I made with SBC+. I did everything I'd do with paper but no mess, no cleanup. I even "rubber stamped" the word art and "edge punched" the purple mat. The only thing I didn't do was tie the bow, haha. Fun stuff!! I used the CM Delight kit and I can't remember which kit "thankful" is from.

Wednesday, May 12, 2010

Mother's Day

Great template from Pixels2Pages, which is sadly going to be taken down this summer. Boo! I'm going to enjoy it while it lasts. Anyway, isn't my little guy so sweet? :)

Tuesday, May 11, 2010

Wow!

I saw this quoted on a blog I follow and wanted to share:

Here's some interesting information I learned from child psychologist, Dr. Ken Condrell. Dr. Condrell specializes in helping children recover from depression and trauma. He says, “ALL children, no matter if they have stress in their life or not, need to have strong self-esteem. And viewing family photo albums with children emphasizes what is right about a child’s life and shows children that the bad stuff is temporary. Pictures and stories offer proof of how they are loved. Everyone, no matter their age, needs photo albums to build their self-esteem and give them hope.”

Friday, April 23, 2010

A Toddler Lives Here

I saw the idea for this page in a recent Creating Keepsakes magazine. That layout was really neat but I wanted to try this new London's Eye template from Pixels2Pages so I went for it. I wasn't sure where to place the journaling and played with a few different options but finally settled for this.

But, the more I looked at it, the less I liked it. I didn't want the journaling to take over the pictures so I played around by flipping the page the other way, making my own matching elements by cutting pieces of the paper out and used the design of the paper to place the journaling. I'm a lot happier with how take 2 turned out. See how cool digiscrappin' is!!

It's coming together...

My new craft space, that is! Dh put my cabinets together and hung my shelf for me. I'm so excited! We are revamping this entire room and this is my space in it. I had the desk already and all of my supplies crammed in an old tv armoire (you can see a little of it in the pic). It worked but we needed to get the armoire out of there to make room for a guest bed. So, dh found these cabinets at Big Lots that happened to match my desk, yay! I thought I was going to have to paint everything. The cabinets hold everything scrapbook related, the desk has some scrapbooking tools on one side and my sewing machine and supplies on the other side. And the Sterilite drawers under the desk hold all of my stamping supplies. The white shelf holds a variety of embellishments for various crafts. On the desk is everything I need for my current project, my tool turn-about and my wonderful Ott light. And my trimmer and Wishblade are top of one cabinet while the other cabinet displays a few things I've done. The desk has an extention leaf that allows me another 12" of work space and I'm going to make something to cover the Sterilite containers. I still need to organize it a bit more and decorate a little but I'm very happy with the progress so far.

Funny Story

I made this card for a good friend of mine. I can post about it now b/c she should have received it. I've been wanting to send her a card to say hello for a couple of weeks now and knew I wanted to use this paper, it just took me a little while to figure out what to do with it. You see, I recycled this paper from a bunco host gift she gave me a year or so ago. She gave me a can filled with some goodies and when I was done with it, I couldn't stand the thought of this cheerful paper being tossed. So, I did what any good crafter would do, I took it off of the can. However, that was a difficult process b/c she used the good tape (the red stuff) to adhere it. I told her about this and she thought it was funny so I thought it appropriate to use it to make her a card. I don't really believe in original ideas but this idea just hit me one day, to have the cute circles peeking out from circles on the card. I made the card square and used my CM circle cutters to cut the circles in the cardfront. I wish I had thought to add a few smaller holes with a hole punch but I'm pretty happy with how it turned out. And of course, I had to use stickles!! I think it helped to make the "i" even more i-ish, hehe. And I like the circle peeking out inside as well. Wonder if she recognized the paper?

Thursday, April 15, 2010

Scrapping Simply vs. Costco

I printed 1 digital scrapbook page at Costco and 8 through Scrapping Simply and I have decided to go with Scrapping Simply from now on. They both use the same paper but the service of SS can't be beat and the price is cheaper if you print enough. I don't have a membership to Costco but my best friend does and in a pinch I could get her to pick up a print for me or meet her there. But, I like how easy it is to upload to Scrapping Simply, the customer service is outstanding, if you're not happy with anything you get a full refund and the price is better. If you print/ship 5 prints, each print is the same price as Costco and if you print/ship over 5 prints, the price is cheaper. I placed my order on Sun. and received it today (Thurs.). I was worried about them bending in shipping but they were packaged very well, no bends at all. I sent 2 emails, 1 before placing my order and 1 after I placed it b/c I was concerned about something and received a response in less than 24 hours and of course my prints turned out perfect. So, I definitely recommend SS!!

Sweet Compliment

The other day I was talking with a friend of mine about the photo globe page I made and she gave me the sweetest compliment. She told me how much she loves my scrapbooks, she said that they are beautiful and I'm an inspiration to her, that I inspired her to make her son an ABC book. I wasn't quite sure what to say, no one has ever said anything like that to me. It made me feel wonderful. I get so much inspiration from my scrapbooking friends and online that I never thought of myself as an inspiration to others. This friend did make her son an ABC album and all I could think about was how he will probably cherish that album one day and how it was made by his very own mommy. That's why I scrapbook. I may be slow and I really don't care if I have a page that's "in style". I enjoy the process of it, both traditional and digital and I want my son to know about his family and our life and maybe one day when I'm gone he'll cherish the stories I've written for him and there will be no doubt in his mind how much he is loved.

Sunday, April 11, 2010

Photo Globe

Sheri-I catered this globe to Noah's pics of the day, let me know if you prefer this for your scrapbook.


I am having a blast with SBC+!! I found this awesome group on Facebook called "Go Digital" and they were trying this Photo Globe technique. I found wonderfully written directions here and gave it a try. It was so much fun....I mean SO MUCH FUN!!! I could do every page like this for a year and be happy I think, LOL.

Saturday, April 10, 2010

Storybook Creator Plus Layouts

I made these layouts yesterday/today. I love SBC+, have I said that before? B/c I really, really love this software!! :)

In this one, I used CM Construction Zone paper, "fun" sticker and brackets from the CM Discover set and the labels are CM digifreebies. The "3" is from a free alpha set from ComputerScrapbook.com and "mud" is typed in a free font (I googled "mud font" and was kind of shocked that one actually existed). Anyway, I love the power of color sampling, as you can see on this LO! And I had tons of fun with the "fun" sticker with texture and the glow effect. On the brackets, I used 2 textures - the bricks then concrete. This was a quick and easy page using CM's Cozy Winter set, including the digifreebie snowflake.

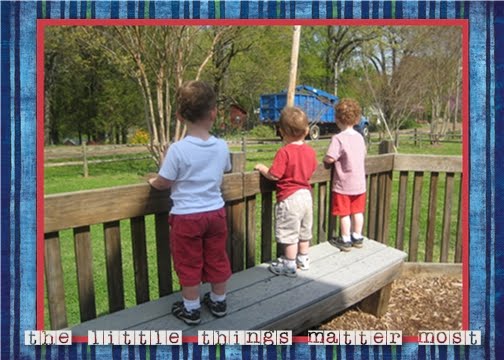
This is where I love SBC+ even more, Walgreen's offered a free 8x10 this week but I didn't need anything that size, I needed 5x7's of this pic. So, I created an 8x10 page and fit 2 of these 5x7 pages I created, saved as a jpg and uploaded to Walgreen's. Cool stuff! This is a pic of my son and his 2 BFF's. Me and the other 2 moms love this pic, first of all they were still enough to get all of them in a pic together and secondly they are doing what they love best, watching a life-size toy! I could have just printed this pic and given it to them but I wanted to make it a little extra special. The paper is from CM's Primary set, photo mat was color sampled from the shorts and the font is called "Rubber Stamp" and was color sampled from the bench.

Wednesday, April 7, 2010

Another Cross

A "Jesus Loves Me" cross for a baby girl.

You are my SONshine!

Walgreen's had a special on 11x14 posters this week and I had an empty 11x14 frame, yay! I made this to go in my bathroom, pics from various baths throughout my sons' first couple of years. Since the opening in the frame isn't quite 11x14, I'll trim the border you see around the photo so it will fit. Can't wait to receive it! I used a paper and sticker (I changed the color) from CM's Discover kit and the duck and bubbles were CM digifreebies, gotta love 'em! I can't remember which CM kit the ribbon is from. The pic looks grainy because I saved it as a low-res to load quicker on the blog.