Okay, I am going to try to explain how I use SU stamps unmounted. I can't take credit for this system-I learned about it from someone at SCS. But, I've had people PM me with questions so I thought I'd take a few pics to explain it. The examples here use SU Happy Winter and Spring Solitude stamp sets. I purchased the Tack'N'Peel from Joanns.com and I already had a bunch of CD cases at home but you can purchase them most anywhere. The slimline cases do not work.
Storage in CD cases: Before I use the stickers, I make a photocopy of them and tape it to the front of the CD case. Then, I take the label and adhere it to the spine of the CD case so I can see it at a glance on the shelf (I adhere it to white paper first so I can see it clearly).

To keep the stamps in the case, I adhere as much vinyl cling as is needed to hold all of the stamps in the set, the sticker adheres to the vinyl cling (I used to use vinyl cling on my blocks to stamp with but it wasn't as sturdy as using Tack'N'Peel).


Well that's it, I hope this makes sense. I love using this UM system. It works great for me. If you're interested in it, try one stamp set and see how you like it.
Storage in CD cases: Before I use the stickers, I make a photocopy of them and tape it to the front of the CD case. Then, I take the label and adhere it to the spine of the CD case so I can see it at a glance on the shelf (I adhere it to white paper first so I can see it clearly).
To keep the stamps in the case, I adhere as much vinyl cling as is needed to hold all of the stamps in the set, the sticker adheres to the vinyl cling (I used to use vinyl cling on my blocks to stamp with but it wasn't as sturdy as using Tack'N'Peel).
Step 1: Trim the stamp. I try to trim it in a way that gives me a hint as to where a certain place is in the stamp. For example, the t, k and y on this stamp stands out when trimmed.
Step 2: Adhere the sticker to the stamp. I stick the design sticker on attempting to line it up using the t, k and y as guides.
Step 3: Trim the sticker. I've tried to adhere the sticker and trim that and the stamp at once but my alignment is not very good (it wasn't when I used wood blocks either).


Step 3: Trim the sticker. I've tried to adhere the sticker and trim that and the stamp at once but my alignment is not very good (it wasn't when I used wood blocks either).
Step 4: Stick on block and stamp away! I've tried adhering the stamp to the block several different ways but my favorite is to use Tack'N'Peel on the blocks. That's all I use now. That stuff is great!
I used to adhere the sticker to white paper first then stick it on the stamp but my placement was always off. I got lucky a few times but not enough to continue doing it that way. Here's an example of what that looks like:
Although the design stands out against the white, I can see it just fine against the grey foam and it's one less step and less hassle.
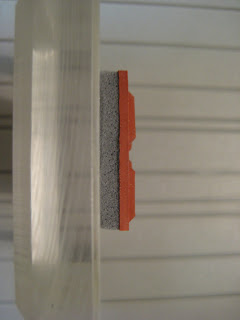
Here's a side view of the block with Tack'N'Peel and the stamp:
Well that's it, I hope this makes sense. I love using this UM system. It works great for me. If you're interested in it, try one stamp set and see how you like it.
P.S. If I buy stamps that are already wood mounted, I pop them in the microwave for a few seconds to pull the stamp off of the wood block. Then, I make my own "sticker" by stamping the image on vinyl cling using StazOn ink. I do have some where the foam came off of the rubber and those work just fine by sticking the rubber image (without the foam) on the Tack'N'Peel.


 There are 6 pockets: diapers/wipes, formula, food, medicines and creams, bath/body and misc.


